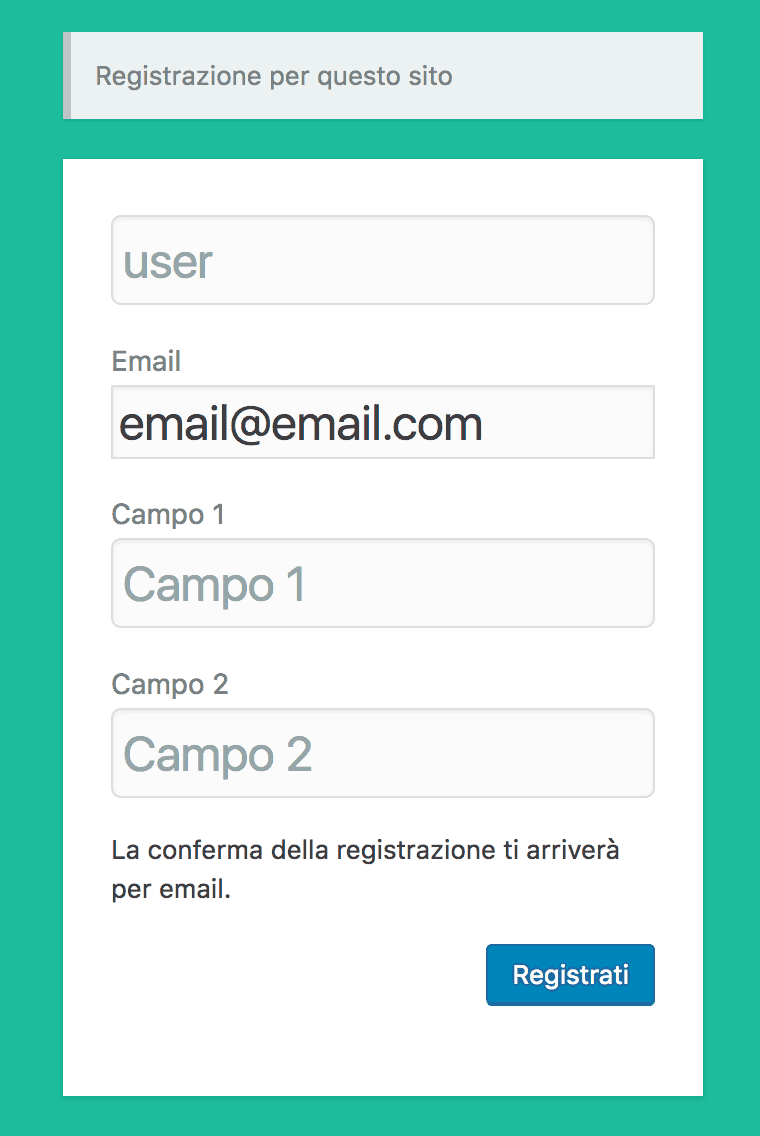
Il form di registrazione di WordPress è nativamente molto snello, infatti chiede solo due campi, il nome utente e l’indirizzo email, questi dati sono necessari per creare un’utenza WordPress ed accedere al sito internet; per svariati motivi potrebbe essere necessario personalizzare il form di registrazione di WP andando ad aggiungere nuovi campi, in questo articolo spiego come farlo creando delle funzioni.
Se non l’avete già fatto è necessario abilitare la registrazione utenti di WordPress, è sufficiente andare sotto Impostazioni \ Generali e spuntare la voce “Chiunque può registrasi“.
Come creare campi personalizzati nel form di registrazione WordPress
Per prima cosa creiamo i custom field che ci interessa far compilare all’utente che si registra.
|
1 2 3 4 5 6 7 8 9 10 11 12 13 14 15 16 17 18 19 20 21 |
//create custom fields add_action( 'register_form', 'custom_reg_form' ); function custom_reg_form() { //fields var $code = ( ! empty( $_POST['campo1'] ) ) ? trim( $_POST['campo1'] ) : ''; $code = ( ! empty( $_POST['campo2'] ) ) ? trim( $_POST['campo2'] ) : ''; ?> <p> <label for="campo1"><?php _e( 'Campo 1', 'mydomain' ) ?><br /> <input type="text" name="campo1" id="campo1" class="input" value="<?php echo esc_attr( wp_unslash( $campo1 ) ); ?>" size="25" /></label> </p> <p> <label for="campo2"><?php _e( 'Campo 2', 'mydomain' ) ?><br /> <input type="text" name="campo2" id="campo2" class="input" value="<?php echo esc_attr( wp_unslash( $campo2 ) ); ?>" size="25" /></label> </p> <?php } |
Come validare i campi di registrazione WordPress
Il secondo passo è quello di validare i campi che abbiamo creato, quindi scriveremo
|
1 2 3 4 5 6 7 8 9 10 11 12 13 14 |
//2. Add validation. In this case, we make sure code is required. add_filter( 'registration_errors', 'custom_reg_errors', 10, 3 ); function custom_reg_errors( $errors, $sanitized_user_login, $user_email ) { if ( empty( $_POST['campo1'] ) || ! empty( $_POST['campo1'] ) && trim( $_POST['campo1'] ) == '' ) { $errors->add( 'campo1_error', __( '<strong>ERROR</strong>: Il Campo 1 è obbligatorio.', 'mydomain' ) ); } if ( empty( $_POST['campo2'] ) || ! empty( $_POST['campo2'] ) && trim( $_POST['campo2'] ) == '' ) { $errors->add( 'campo2_error', __( '<strong>ERROR</strong>: Il Campo 2 è obbligatorio.', 'mydomain' ) ); } return $errors; } |
[alert type=”info”] Ovviamente se non abbiamo la necessità di validare un campo sarà sufficiente non scrivere la condizione IF[/alert]
Come salvare i campi di registrazione personalizzati di WordPress nel profilo utente
Fatto ciò può essere utile salvare i campi che abbiamo fatto compilare all’utente all’interno del profilo utenti di WordPress, scriviamo quindi :
|
1 2 3 4 5 6 7 8 9 10 11 12 13 14 15 16 17 18 19 20 21 22 |
//3. Finally, save our extra registration user meta. add_action( 'user_register', 'custom_reg_user_register' ); function custom_reg_user_register( $user_id ) { if ( ! empty( $_POST['campo1'] ) ) { update_user_meta( $user_id, 'campo1', trim( $_POST['campo1'] ) ); } if ( ! empty( $_POST['campo2'] ) ) { update_user_meta( $user_id, 'campo2', trim( $_POST['campo2'] ) ); } } // Hooks near the bottom of profile page (if current user) add_action('show_user_profile', 'custom_user_profile_fields'); // Hooks near the bottom of the profile page (if not current user) add_action('edit_user_profile', 'custom_user_profile_fields'); // @param WP_User $user function custom_user_profile_fields( $user ) { ?> |
Modifica del form di registrazione WordPress
Fatto ciò non ci rimane che modificare il form di registrazione e fare in modo che i dati siano visibili nel profilo utente
|
1 2 3 4 5 6 7 8 9 10 11 12 13 14 15 16 17 18 19 20 21 22 23 24 25 26 27 28 29 30 31 32 |
<table class="form-table"> <tr> <th> <label for="campo1"><?php _e( 'Campo 1' ); ?></label> </th> <td> <input type="text" name="campo1" id="campo1" value="<?php echo esc_attr( get_the_author_meta( 'campo1', $user->ID ) ); ?>" class="regular-text" /> </td> </tr> <tr> <th> <label for="campo2"><?php _e( 'Campo 2' ); ?></label> </th> <td> <input type="text" name="campo2" id="campo2" value="<?php echo esc_attr( get_the_author_meta( 'campo2', $user->ID ) ); ?>" class="regular-text" /> </td> </tr> </table> <?php } // Hook is used to save custom fields that have been added to the WordPress profile page (if current user) add_action( 'personal_options_update', 'update_extra_profile_fields' ); // Hook is used to save custom fields that have been added to the WordPress profile page (if not current user) add_action( 'edit_user_profile_update', 'update_extra_profile_fields' ); function update_extra_profile_fields( $user_id ) { if ( current_user_can( 'edit_user', $user_id ) ) update_user_meta( $user_id, 'campo1', $_POST['campo1'] ); update_user_meta( $user_id, 'campo2', $_POST['campo2'] ); } |
Tutto il codice lo puoi inserire nel file functions.php del tema in uso, oppure puoi creare un plugin per WordPress


Ciao,
ma tutto questo codice dove bisogna inserirlo?In quale pagina?
Grazie
Grazie Alessio per la guida, testata e perfettamente funzionante, volevo chiederti che valore passa con ‘mydomain’ se va sostituito o ha una funzione in particolare