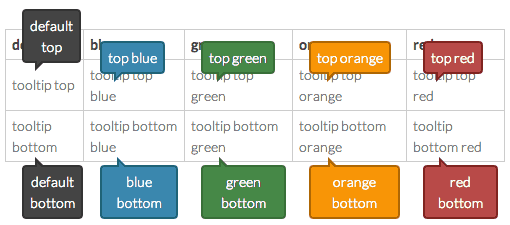
I Tooltips sono delle piccole finestre che si aprono normalmente al passaggio del mouse su un link ipertestuale, nella compilazione di un form oppure appaiono per mostrare eventuali avvisi o errori all’interno di un sito web.

Con CSS3 ed HTML5 è possibile creare dei tooltip molto carini e semplici, senza ricorrere all’utilizzo di jQuery o altre librerie Javascript.
Vediamo subito un esempio pratico.
|
1 |
<a class="tooltip" href="mio_link.html" data-tool="classico">classico</a> |
la classe tooltip serve per la formattazione del tooltip vero e proprio, invece la proprietà CSS3 data-tool=”classico” contiene il testo del tooltip .
In questo caso avremo un effetto come nella figura sottostante
 Il CSS3 che regola e formatta il tooltip è il seguente
|
1 2 3 4 5 6 7 8 9 10 11 12 13 14 15 16 17 18 19 20 21 22 23 24 25 26 27 28 29 30 31 32 33 34 35 36 37 38 39 40 41 42 43 44 45 46 47 48 49 50 51 52 53 54 55 56 57 58 59 60 61 62 63 64 65 66 67 68 69 70 71 72 73 74 75 76 77 78 79 80 81 82 83 84 85 86 87 88 89 90 91 92 93 94 95 96 97 98 99 100 101 102 103 104 105 106 107 108 109 110 111 112 113 114 115 116 117 118 119 120 121 122 123 124 125 126 127 128 129 130 131 |
a.tooltip{ position: relative; display: inline; } a.tooltip:after{ display: block; visibility: hidden; position: absolute; bottom: 0; left: 20%; opacity: 0; content: attr(data-tool); /* might also use attr(title) */ height: auto; min-width: 100px; padding: 5px 8px; z-index: 999; color: #fff; text-decoration: none; text-align: center; background: rgba(0,0,0,0.85); -webkit-border-radius: 5px; -moz-border-radius: 5px; border-radius: 5px; } a.tooltip:before { position: absolute; visibility: hidden; width: 0; height: 0; left: 50%; bottom: 0px; opacity: 0; content: ""; border-style: solid; border-width: 6px 6px 0 6px; border-color: rgba(0,0,0,0.85) transparent transparent transparent; } a.tooltip:hover:after{ visibility: visible; opacity: 1; bottom: 20px; } a.tooltip:hover:before{ visibility: visible; opacity: 1; bottom: 14px; } a.tooltip.animate:after, a.tooltip.animate:before { -webkit-transition: all 0.2s ease-in-out; -moz-transition: all 0.2s ease-in-out; -ms-transition: all 0.2s ease-in-out; -o-transition: all 0.2s ease-in-out; transition: all 0.2s ease-in-out; } /* tips on bottom */ a.tooltip.bottom:after { bottom: auto; top: 0; } a.tooltip.bottom:hover:after { top: 28px; } a.tooltip.bottom:before { border-width: 0 5px 8.7px 5px; border-color: transparent transparent rgba(0,0,0,0.85) transparent; top: 0px } a.tooltip.bottom:hover:before { top: 20px; } /* tips on the right */ a.tooltip.right:after { left: 100%; bottom: -45%; } a.tooltip.right:hover:after { left: 110%; bottom: -45%; } a.tooltip.right:before { border-width: 5px 10px 5px 0; border-color: transparent rgba(0,0,0,0.85) transparent transparent; left: 90%; bottom: 2%; } a.tooltip.right:hover:before { left: 100%; bottom: 2%; } /* tips on the left */ a.tooltip.left:after { left: auto; right: 100%; bottom: -45%; } a.tooltip.left:hover:after { right: 110%; bottom: -45%; } a.tooltip.left:before { border-width: 5px 0 5px 10px; border-color: transparent transparent transparent rgba(0,0,0,0.85); left: auto; right: 90%; bottom: 2%; } a.tooltip.left:hover:before { right: 100%; bottom: 2%; } /* tooltip colors (modifica i colori per cambiare il layout del tooltip!) */ a.tooltip.blue:after { background:#5f87c2; } a.tooltip.blue:before { border-color: #5f87c2 transparent transparent transparent; } a.tooltip.bottom.blue:before{ border-color: transparent transparent #5f87c2 transparent; } a.tooltip.right.blue:before { border-color: transparent #5f87c2 transparent transparent; } a.tooltip.left.blue:before { border-color: transparent transparent transparent #5f87c2; } /* input field tooltips */ input + .fieldtip { visibility: hidden; position: relative; bottom: 0; left: 15px; opacity: 0; content: attr(data-tool); height: auto; min-width: 100px; padding: 5px 8px; z-index: 9999; color: #fff; font-size: 1.2em; font-weight: bold; text-decoration: none; text-align: center; background: rgba(0,0,0,0.85); -webkit-border-radius: 5px; -moz-border-radius: 5px; border-radius: 5px; -webkit-transition: all 0.2s ease-in-out; -moz-transition: all 0.2s ease-in-out; -ms-transition: all 0.2s ease-in-out; -o-transition: all 0.2s ease-in-out; transition: all 0.2s ease-in-out; } input + .fieldtip:after { display: block; position: absolute; visibility: hidden; content:''; width: 0; height: 0; top: 8px; left: -8px; border-style: solid; border-width: 4px 8px 4px 0; border-color: transparent rgba(0,0,0,0.75) transparent transparent; -webkit-transition: all 0.2s ease-in-out; -moz-transition: all 0.2s ease-in-out; -ms-transition: all 0.2s ease-in-out; -o-transition: all 0.2s ease-in-out; transition: all 0.2s ease-in-out; } input:focus + .fieldtip, input:focus + .fieldtip:after { visibility: visible; opacity: 1; } |
Nel file css allegato all’archivio .zip, dalla riga 215 è possibile personalizzare la colorazione dei toolips cambiando semplicemente il valore esadecimale.
Programmatore WordPress Esperto WooCommerce
Sono l’autore di questo blog con tanti trucchi e guide su WordPress e WooCommerce.


