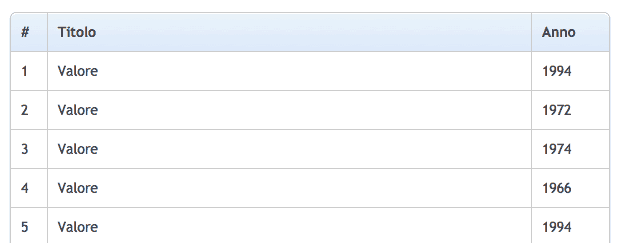
Con il CSS3 si possono creare davvero cose molto carine e di sicuro impatto visivo, per esempio oggi vediamo come creare una tabella con i bordi arrotondati, utilizzando solo il CSS3 senza ricorrere a JQuery.
Iniziamo scrivendo L’HTML che conterrà semplicemente la nostra tabella applicando una classe che per convenzione chiameremo bordered
| # | Titolo | Anno |
|---|---|---|
| 1 | Valore | 1994 |
| 2 | Valore | 1972 |
| 3 | Valore | 1974 |
Ora prepariamo il foglio di stile CSS3
|
1 2 3 4 5 6 7 8 9 10 11 12 13 14 15 16 17 18 19 20 21 22 23 24 25 26 27 28 29 30 31 32 33 34 35 36 37 38 39 40 41 42 43 44 45 46 47 48 49 50 51 52 53 54 55 56 57 58 59 60 61 62 63 64 65 66 67 68 69 70 71 72 73 74 75 76 |
table { *border-collapse: collapse; /* IE7 and lower */ border-spacing: 0; width: 100%; background:#ffffff !important; /* For IE*/ } .bordered { border: solid #ccc 1px; -moz-border-radius: 6px; -webkit-border-radius: 6px; border-radius: 6px; behavior: url(border-radius.htc); -webkit-box-shadow: 0 1px 1px #ccc; -moz-box-shadow: 0 1px 1px #ccc; box-shadow: 0 1px 1px #ccc; } .bordered tr:hover { background: #fbf8e9; -o-transition: all 0.1s ease-in-out; -webkit-transition: all 0.1s ease-in-out; -moz-transition: all 0.1s ease-in-out; -ms-transition: all 0.1s ease-in-out; transition: all 0.1s ease-in-out; } .bordered td, .bordered th { border-left: 1px solid #ccc; border-top: 1px solid #ccc; padding: 10px; text-align: left; } .bordered th { background-color: #dce9f9; background-image: -webkit-gradient(linear, left top, left bottom, from(#ebf3fc), to(#dce9f9)); background-image: -webkit-linear-gradient(top, #ebf3fc, #dce9f9); background-image: -moz-linear-gradient(top, #ebf3fc, #dce9f9); background-image: -ms-linear-gradient(top, #ebf3fc, #dce9f9); background-image: -o-linear-gradient(top, #ebf3fc, #dce9f9); background-image: linear-gradient(top, #ebf3fc, #dce9f9); -webkit-box-shadow: 0 1px 0 rgba(255,255,255,.8) inset; -moz-box-shadow:0 1px 0 rgba(255,255,255,.8) inset; box-shadow: 0 1px 0 rgba(255,255,255,.8) inset; border-top: none; text-shadow: 0 1px 0 rgba(255,255,255,.5); } .bordered td:first-child, .bordered th:first-child { border-left: none; } .bordered th:first-child { -moz-border-radius: 6px 0 0 0; -webkit-border-radius: 6px 0 0 0; border-radius: 6px 0 0 0; behavior: url(border-radius.htc); } .bordered th:last-child { -moz-border-radius: 0 6px 0 0; -webkit-border-radius: 0 6px 0 0; border-radius: 0 6px 0 0; behavior: url(border-radius.htc); } .bordered th:only-child{ -moz-border-radius: 6px 6px 0 0; -webkit-border-radius: 6px 6px 0 0; border-radius: 6px 6px 0 0; behavior: url(border-radius.htc); } .bordered tr:last-child td:first-child { -moz-border-radius: 0 0 0 6px; -webkit-border-radius: 0 0 0 6px; border-radius: 0 0 0 6px; } .bordered tr:last-child td:last-child { -moz-border-radius: 0 0 6px 0; -webkit-border-radius: 0 0 6px 0; border-radius: 0 0 6px 0; behavior: url(border-radius.htc); } |
Compatibilità con i browsers
| 5.0 4.0 -webkit- |
9.0 | 4.0 3.0 -moz- |
5.0 3.1 -webkit |
10.5 |
La proprietà border-radius è compatibile con i maggiori browser più aggiornati, per avere la compatibilità con versioni di Microsoft Internet Explorer antecedenti alla 9.0, è necessario ricorrere ad un escamotage.
Come rendere il border-radius compatibile su (Internet Explorer) IE8, IE7 e IE6
Se riguardate il CSS che ho scritto sopra, troverete in alcune righe e più precisamente ogni volta che viene richiamata la proprietà border-radius, questa sintassi behavior: url(border-radius.htc); questo è un file che contiene le istruzione per rendere compatibile i bordi arrotondati anche su queste versioni di Internet Explorer, è sufficiente mettere il file border-radius.htc nella stessa cartella in cui risiede il file CSS.
Programmatore WordPress Esperto WooCommerce
Sono l’autore di questo blog con tanti trucchi e guide su WordPress e WooCommerce.


